This article explains how to integrate your Infinity and Facebook accounts, enabling you to see Infinity data within Facebook.
Facebook is the leading social media platform, used by marketers worldwide who take advantage of it's micro-targeting to reach an exact audience.
You can advertise to people by age, interests, behaviour, and location. That’s great for your budget, conversion rates, and return on investment.
Infinity’s integration with Facebook lets you understand the phone traffic driven by your Facebook activity. You can get a complete picture of the events your activities drive, automatically send events into Facebook after each call and view them in the context of other campaign results.
You can use call data to increase Facebook ROI and optimise your marketing spend using those newly acquired insights.
Infinity's Facebook integration automatically sends calls into Facebook which can then be matched to the visitor journey that led to the call, so that clients can link phone calls back to the Facebook activity that helped drive the call and see the full impact of their Facebook activity.
Setting up your Facebook integration requires several steps:
The first one needs to be carried out in Facebook, the next are carried out in Infinity and then your website.
In Facebook
- Create an Access Token
In Infinity / On your website
- Use the JS Generator to update your Infinity code snippet
- Generate UUIDs on your website
- Update your Facebook pixel to capture UUIDs
- Configure the Integration in Infinity
Before tackling any of the steps above you need to ensure you have access to Facebook's Conversions API, as this is where our integration will send events. It is not enabled by default but it's easy to check whether you already have access.
Go into Facebook Business, look in the Events Manager, locate your Pixel and then click Settings
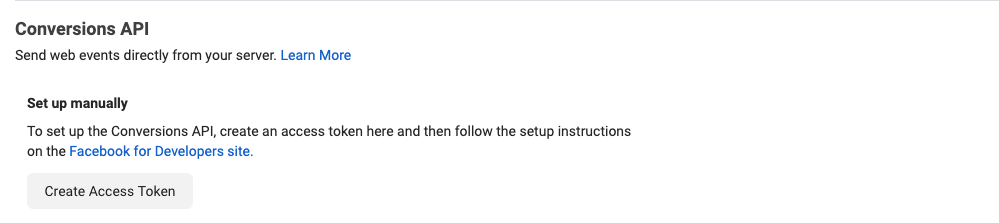
If you can see a section named Conversions API as shown below, then you have access to the API.
If not, simply contact your Facebook Business Manager and send them your pixel id and ad account id and they can arrange for your account to be whitelisted for API access.
The first part of the setup process is carried out in Facebook. As mentioned in the previous paragraph, you will need access to the Facebook Marketing API in order to configure the integration. Having established you have access to the API you can proceed to the first step.
Step 1 - Create an Access Token
- You need to generate an access token which you can share with Infinity so that we can pass events into the Facebook API on your behalf.
- Navigate to Events Manager, select Pixels, select your Facebook pixel and then click Settings from the left hand navigation.
- From the Settings page, scroll down until you can see the section called Conversions API
- Click on the Create Access Token button. This will show a quick animation, click Next to progress through it and then click the blue Set Up button to get started.
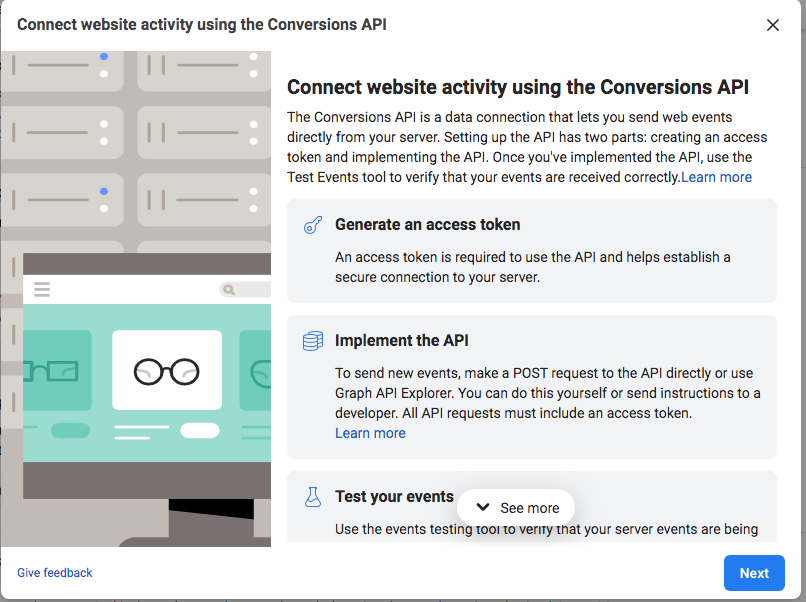
- You will then be presented with a wizard that will guide you through the two simple steps needed to create an access token.
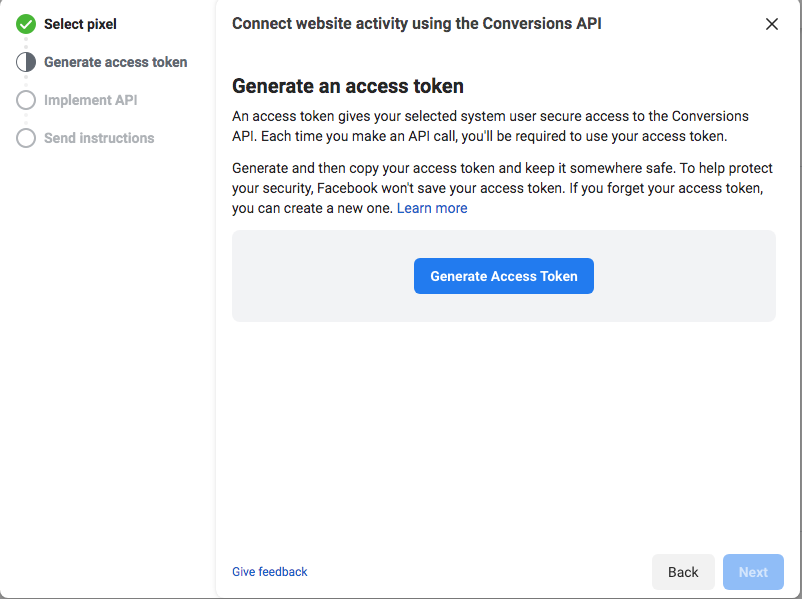
- The first step is to select a pixel, simply select the pixel you want the call events to be linked to and then click the blue Next button to continue
- The second step is to generate the access token. Click the blue Generate Access Token button to continue, as shown below
- Facebook will then generate an access token. It's sensitive so Facebook will not store it, you need to copy it and store it somewhere safe, you will need it in a subsequent stage of the setup process.
- Click the blue Next button to continue. You can safely ignore the steps on the next page, click the blue Done button to continue.
- This concludes the setup steps that need to be carried out in Facebook.
The second part of the setup process needs to be carried out in the Infinity platform and on your website.
The first step is to update the Infinity JavaScript snippet on your web pages to include the Facebook-specific code. You can then configure the integration and determine what data you’d like to send into Facebook.
Step 1 - Adding the JavaScript
- We need to add some Facebook-specific code to the Infinity JavaScript on your website. This will capture the UUID of the visitor in question and also the Facebook pixel ID that you want us to send events into.
- The code will capture the UUID (that you will add in the next step) and Facebook pixel ID as two custom variables. The code that captures the UUID is looking for global variable called uniqueId. This is the variable created by our recommended UUID snippet in the next section. If you are already generating UUIDs on the page you will need to modify the following line in the Infinity javascript:
_ictt.push(['_includeExternal', [{'from':'uniqueId','to':'_setCustomVar','as':'fb_uuid'}]])
If you are already generating UUIDs on the page, simply replace uniqueId in the line above with the variable name that you use for the UUID.
- To update the JavaScript snippet, Log in to the Infinity Portal, navigate to the Admin section, select Tracking Settings and JavaScript.
- Select the Facebook integration using the checkbox in Step 1 of the JavaScript generator. This will add the Facebook script to the Infinity code, an example is shown below
- Enter your Facebook Pixel ID into the input box, this will automatically update the JS snippet to include it.
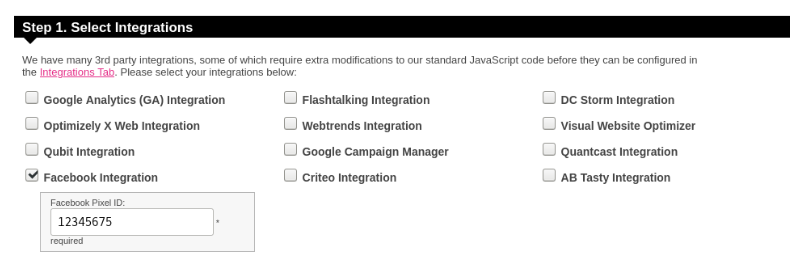
This will add the code needed for the Facebook integration into the code generator box. Then simply copy and paste the updated code onto your website pages, you can click copy to clipboard in the top right corner of the code generator to help you.
Please be aware when using the JS Generator it does not retain details of the integrations you are already using and must be updated each time to reflect that. For example, if you are using our GA and Criteo integrations and you want to add the Facebook integration, you need to select the GA, Criteo and Facebook integration checkboxes in order to generate the correct code snippet.
<!-- IMPORTANT Please refer to https://www.infinity.co/knowledge-base/article/facebook-integration for details on updating your Facebook pixel -->

<!-- Infinity Tracking Code v2.0
 Copyright Infinity 2020
 www.infinity.co -->
<script type="text/javascript">
    var _ictt = _ictt || [];
    _ictt.push(['_setIgrp','XXXX']); // Installation ID
    _ictt.push(['_enableGAIntegration',{'gua':true,'ga':false}]);
    _ictt.push(['_setCustomVar',['fb_pid','123456']]);
    _ictt.push(['_includeExternal',[{'from':'uniqueId','to':'_setCustomVar','as':'fb_uuid'}]]);
    _ictt.push(['_includeExternal',[{'fromCookie':'_fbc','to':'_setCustomVar','as':'fbc'}]]);
    _ictt.push(['_includeExternal',[{'fromCookie':'_fbp','to':'_setCustomVar','as':'fbp'}]]);
    _ictt.push(['_enableAutoDiscovery']);
    _ictt.push(['_track']);
(function() {
    var ict = document.createElement('script'); ict.type = 'text/javascript'; ict.async = true;
    ict.src = ('https:' == document.location.protocol ? 'https://' : 'http://') + 'ict.infinity-tracking.net/js/nas.v1.min.js';
    var scr = document.getElementsByTagName('script')[0]; scr.parentNode.insertBefore(ict, scr);
})();
</script>
<!-- Infinity Tracking Code End -->
The revised code should be placed just before the closing </head> tag element within each page of the website as this will allow for the fastest execution.
Step 2 - Generate UUIDs on your website
- One of the foundational elements of this integration is generating unique user ids that will be used to link the Facebook visitor with any subsequent phone calls.
- You will need to add a snippet of code to your site to generate a Universally Unique ID (UUID).
- Here’s an example snippet to help you generate a unique ID. We’d recommend you consult with a developer and test thoroughly before adding to your site.
<script>
    generateId = function() {
        var lut = []; for (var i=0; i<256; i++) { lut[i] = (i<16?'0':'')+(i).toString(16); }
        var d0 = Math.random()*0xffffffff|0;
        var d1 = Math.random()*0xffffffff|0;
        var d2 = Math.random()*0xffffffff|0;
        var d3 = Math.random()*0xffffffff|0;
        return lut[d0&0xff]+lut[d0>>8&0xff]+lut[d0>>16&0xff]+lut[d0>>24&0xff]+
        lut[d1&0xff]+lut[d1>>8&0xff]+lut[d1>>16&0x0f|0x40]+lut[d1>>24&0xff]+
        lut[d2&0x3f|0x80]+lut[d2>>8&0xff]+lut[d2>>16&0xff]+lut[d2>>24&0xff]+
        lut[d3&0xff]+lut[d3>>8&0xff]+lut[d3>>16&0xff]+lut[d3>>24&0xff];
    };

    uniqueId = generateId();
</script>
The Javascript generator we used in the previous step includes all the changes necessary to provide Infinity the pixel ID and read the ID from the global uniqueId property. You will need to modify this yourself if you wish to provide different pixel IDs on different pages, or use a different method to generate a unique visitor ID.
When adding the script to your website pages we recommend placing it as high up the page as possible since the ids it generates need to be available for both the Facebook pixel and Infinity's code, so it needs to be placed before those two elements.
Step 3 - Update your Facebook pixel to capture UUIDs
- Having added a code snippet in step 2 to generate UUIDs, you will need to update your Facebook pixel so that it captures these newly generated IDs.
- The ID serves as the link between the online journey and any phone calls, adding it to your Facebook pixel ensures it's added to the pixel dataset for that visitor. When Infinity pass any subsequent phone calls into your Facebook pixel, we will include the same identifier, which will allow Facebook to match the call to the visitor. Facebook call this identifier an external_id.
- Simply update your existing Facebook code snippet to include the external id, as per the example below, remembering to replace the PIXEL_ID placeholder with your actual pixel ID. The code will look for the global variable called uniqueId and pass it to Facebook with a key of external_id.
- If you are generating UUIDs and not using the method & script suggested by Infinity in the previous step, you need to update the uniqueid with the name you've attributed to the UUIDs you're generating.
fbq('init', '<PIXEL_ID>', {'external_id': uniqueId});
JS Checklist
Since there are 3 code elements on each page of your site that need to work in harmony, let's just recap on the changes that you should have made to your site pages in order to generate and capture the variables we need for the Facebook integration to function correctly.
- You should have used the JS Generator in Infinity to create the Facebook-specific JS elements for the Infinity code. This should then have been added to every page of your site. This code will collect 2 Custom Variables; the Facebook pixel ID and also the UUIDs for the pageview in question.
- You should have added a code snippet to each page to generate a UUID for each pageview. If you used the example provided by Infinity, this will generate a variable called uniqueId, which the Infinity code will capture. This snippet needs to be placed higher on the page than both the Infinity snippet and the Facebook pixel, since the UUIDs it generates need to be available to both those elements.
- You should have updated your Facebook pixel to add an additional line to capture the UUIDs you are generating in the previous step. If you used the example provided by Infinity, this looks for a variable called uniqueId, which is what our example UUID script will generate. If you are already generating UUIDs, you will need to update the line in the Infinity JS and also the Facebook pixel, replacing the uniqueId value in both with the name that your method uses to describe the UUID it generates. In other words, replace uniqueId with whatever your UUID generation method creates.
Step 4 - Configure the integration in Infinity
- With the code changes made to your site, the final part of the setup is to configure the integration in Infinity
- Log in to the Infinity Portal, navigate to the Admin section, and select Integrations.
- At the top of the list of your integrations, select Add Integration, and choose Facebook from the drop down. Please note that this can be a chargeable integration, additional charges may apply.
- First you need to give your integration a name. It is called Facebook by default but you can edit it. Choose something that you'll easily be able to identify later.
- Enter your Pixel ID. This is the ID of the pixel you wish to send events into, and must match the one you used in the JS generator.
- Enter your Access Token. This is the access token you generated in Facebook earlier in the process.
- Enter the name that you want to assign to these events in Facebook. We'd recommend Infinity Phone Call.
- As an optional step, select an option from the Conversion Value to pass a value into Facebook. This can be a transaction value, goal value or no value, which is labelled as Not Sent in the dropdown. These transaction and goal values need to be captured in your Infinity installation using Call Ratings or CRM events.
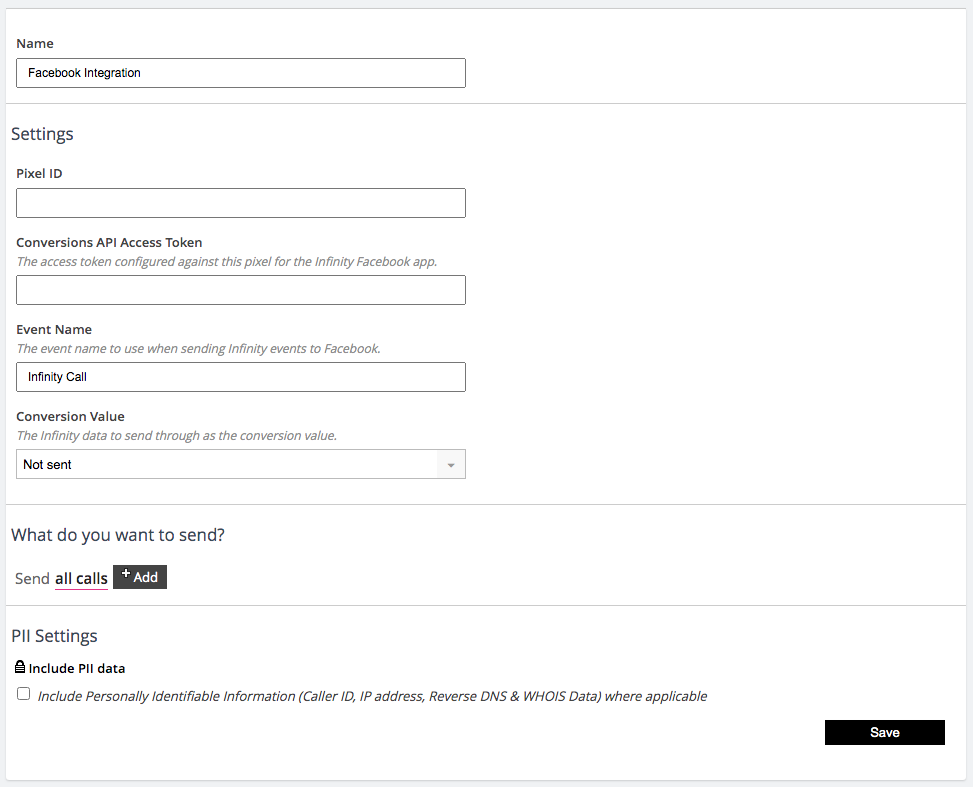
- We will pass all calls into Facebook by default, but this can be changed as required using the options in What do you want to send. You may choose to only send calls that meet a goal, for example.
- Additionally, you have the option to pass PII data into the Facebook integration which can be used to aid matching. This includes the Caller ID of the visitor, together with their IP address and user agent. This is disabled by default to prevent PII from being passed out of Infinity into Facebook, but you can enable it if you wish.
- Click Save to complete the setup process.
- Conversion events should be visible within Facebook shortly afterwards.
Multiple Pixels
- The expectation in this guide is that you have a single Facebook pixel that is used across your website.
- In the unlikely event that you have multiple pixels across your site you will need to undertake the steps to update Infinity's JS snippet for each pixel that your site uses.
- Specifically, you will need to use Infinity's JS Generator to generate a code snippet for each pixel ID, and then add the updated code to each page that uses that pixel.
- In addition, you will need to repeat the final step in this guide (Configure the integration in Infinity) for each pixel, remembering of course that you will need to have generated an access token for each pixel.
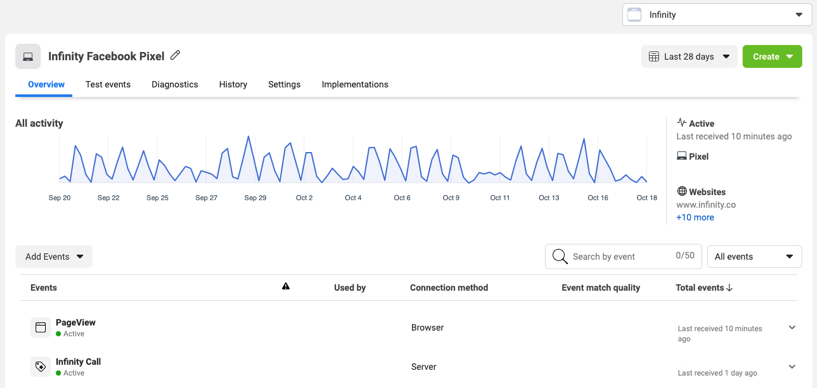
Having successfully completed the setup process, the final step is to validate that you’re seeing call events being passed into Facebook.
Simply navigate to Business Manager, select Events Manager and select your pixel.
From the overview tab you should be able to see an activity trace for Infinity Call events, like the one shown below.
The core benefits of the integration are as follows:
- Create custom audiences
- Acquire new customers using lookalike audiences
- Native reporting - view calls alongside other data in Facebook
- Link calls to the activity that drove them
- Campaign Optimisation
In this next section we will share how you can unlock all of the incredible conversion data that you are now passing into Facebook from Infinity.
Once you have configured the integration, Infinity calls pull through to events manager via the Facebook pixel data source, as shown above. Here you can see a summary of the total number of call events, regardless of campaign.
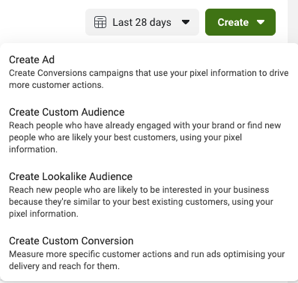
Now that the event is in being pushed into Facebook, we can use it to create audiences and to create custom conversions, all of which can be carried out from this same view in Event Manager, simply by clicking the green Create button in the top right hand corner.
Clicking the create button brings up the options shown below, which allow you to create Ads, Custom and Lookalike Audiences and the Create Custom Conversions. We will look at the last option first, Custom Conversions.
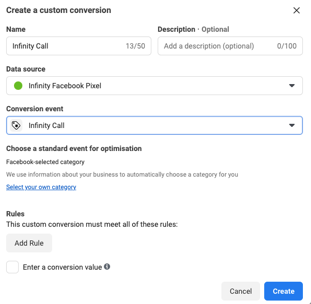
The event data Infinity sends into Facebook isn’t part of the core data, it’s a custom event. This means that it is not visible in the campaign reporting automatically or by default. We need to create a Custom Conversion in order to make it visible in the reporting.
From Events Manager, simply click the green Create button and select Create Custom Conversion. Give your conversion a name – we’d recommend sticking with Infinity Call, your pixel will be pre-selected as the data source, so simply locate the Infinity Call event from the Conversion Event dropdown, add any additional rules and values and click Create to continue.
Now we have native reporting of Infinity data in Facebook. You can view calls alongside other data in Facebook, and, mostly importantly, when you look at campaign performance in Ads Manager, when you hover over the Results column, you can now see any Infinity Calls that were driven by that campaign alongside any other events, as shown below.
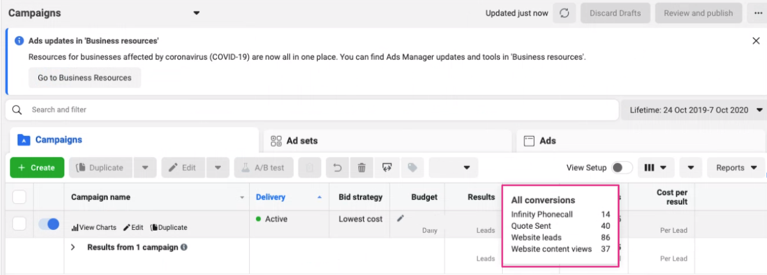
Please note that you do not need to have chosen calls as the outcome of the campaign in order for them to be visible against that campaign. You can, however, decide that you wish to optimise the campaign for that custom conversion.
Simply click Edit on the campaign, and adjust the optimisation options towards call. This is great if, for example, you were running a call campaign where end users could ring up to get a special offer. You can now re-optimise for the Infinity call event, since it exists as a custom conversion.
Using Audiences
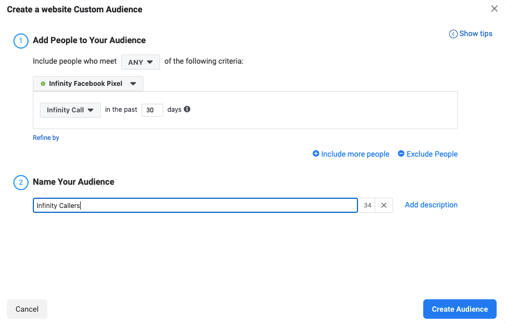
You can use audiences in a number of ways, with the two main options being creating a custom audience and a lookalike audience. To create a custom audience, navigate to Events Manager, simply click the green Create button and select Create Custom Audience. Your Facebook pixel will be pre-selected, so simply click the audience dropdown and choose the Infinity Call event as the criteria for the audience creation. You can add to this as you wish, but creating an audience from your callers will allow you to easily create a custom audience of people that you know call, and build a campaign to encourage them to call again, for example.
You could also exclude past callers from seeing ads aimed at driving new leads or online conversions, which will help to optimise your online efforts.
You can also expand your reach and acquire new customers by building a new lookalike audience or people who you think are likely to call.
We anticipate that you can configure the Facebook integration using the instruction provided, but appreciate that there are a few moving parts.
The following is a checklist of steps you must have undertaken in order to setup the integration correctly. Details about each step can be found here
1. Secured access to the Facebook Conversions API
Your Facebook account needs to be granted access to the Facebook Marketing API in order to send in events, such as phone calls. It is not enabled by default, you need to contact you Facebook Business Account Manager in order to get your Facebook Ads account whitelisted.
2. Create an Access Token in Facebook
You need to create an Access Token that can be shared with Infinity in order to allow us to send events on your behalf to the Facebook Conversions API.
3. Use the JS Generator in Infinity to update your Infinity code snippet
You need to use Infinity's JS Generator in order to generate a code snippet that includes the Facebook-specific code. This must then be added to every page of your website.
4. Generate UUIDs on your website
You need to generate universally unique IDs for every pageview in your website. This code snippet needs to be placed high up the page to ensure it's available to both the Facebook pixel and the Infinity code.
5. Update your Facebook pixel to capture UUID
Having added the code to generate UUIDs for each pageview, you need to add an additional line of code to your Facebook pixel to capture this UUID and pass it to Facebook.
6. Configure the Integration in Infinity
Having made all the code changes to each page on your site, you can then configure the integration in Infinity, to send events into Facebook.
If you encounter difficulties or have any questions, please contact our support team at support@infinity.co who will be happy to assist you.
Please login to rate this article


