This article describes how to set up and configure devices remotely in the Infinity PBX, including the ability to link users to devices.
Infinity have added the ability for you to configure devices remotely in the Infinity PBX. Having obtained the MAC address of the device in question, you can add it Infinity platform using its MAC address as an identifier and give it a friendly name to help you identify it more easily.
You can then simply add a user to that device. Once the phone has provisioned itself it will route calls for the user linked to the device to that phone.
In order to maintain the security of your network and prevent unauthorised access from devices outside of your organisation, you will need to whitelist your location’s IP address (or address range) in order to connect devices to the network. This should be done prior to adding the devices.
Adding your devices and linking them to users is a straightforward process, the steps are as follows:
- Add your office IP address to the Trusted IPs list in Infinity
- Make a note of your device's MAC address
- Add the device to the Infinity phone system
- Link the device to a user
- Point the device at Infinity's provisioning server - either manually or via DHCP (Option 66)
If you already have devices in use with Infinity and simply want to connect them to users, you can skip step 5 - pointing the devices at Infinity's provisioning server.
To ensure that only devices from within your organisation can be added to the network, you will need to whitelist your office IP address.
To view and manage your trusted IPs, log in to your Infinity PBX installation, and navigate to Telephony Settings, as shown below.

Select the Phone System Install you’d like to edit.

Then select the Trusted IPS tab. Within the Trusted IPs section, you’ll see a list of IP addresses or ranges that you’ve previously chosen to whitelist. If you’ve not done this previously the list will be blank.

To add a new address or range, simply enter the value into the IP range field at the bottom of the list, and press Add IP Range. Don’t forget to add a description for future reference so that you know which location this is authorising access from.
Only ipv4 ranges are permitted, and values must follow the CIDR notation; 0.0.0.0/0.
If you’re unsure of this value, please contact your IT administrator for more information on the IP range you need to enter.
The second step is to make a note of the MAC address of your device.
Simply connect a network cable and wait for the device to initialise. If you are using a Yealink handset, you can simply press OK to see the device’s MAC address.
Make a note of it as you will need it later.
The third step is to add the device to the Infinity phone system. This will allow you to associate it to a user and be able to quickly link a device to a user remotely.
Having captured the MAC address of the device in question in Step 2 earlier, you can now add the device to the Infinity Phone System.
To view and add devices log in to your Infinity PBX installation, and navigate to Telephony Settings.
Select the Phone System Install you’d like to add devices to and click on it, then select the Devices tab, as shown below.
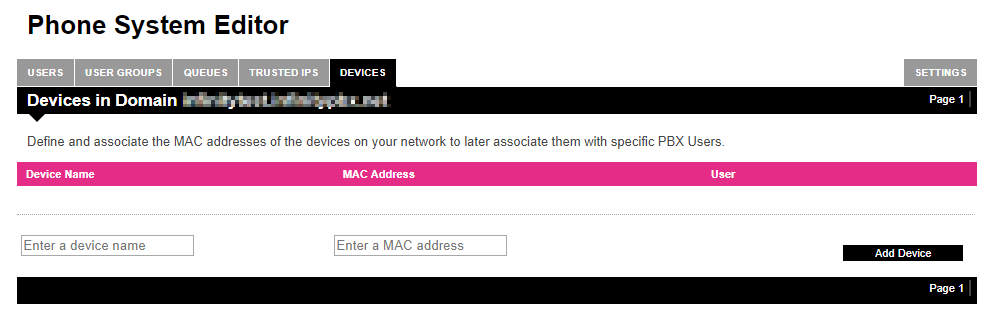
From here you can simply add a device by entering a friendly name and the MAC address of the device and clicking Add Device. You will see the device you added appear in the devices list.
Notice that alongside the columns for device name and MAC address in the device list there is also column for User, which will be empty.
The fourth step is to link the device to a user.
Click on the Users tab in the Phone System Editor and click manage in the Devices column.
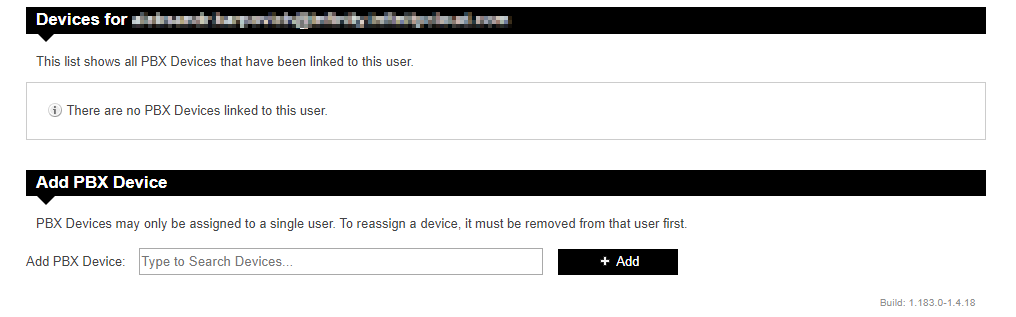
Enter the friendly name of the device you want to link to the user and click Add.
The settings will take around two minutes to take effect, after which calls for that user will be routed to the device in question.
The final step is to point the device at Infinity's provisioning server in order to load the configuration settings onto the device so that it can be used with the Infinity PBX.
If you’re using Yealink handsets Infinity have guide that can walk you through the setup, just contact support to obtain a copy.
The following FAQ covers questions you might have regarding remote management of PBX devices.
How do I add a user to a device?
If the device is not currently linked to user, simply locate that user on the Users page of the Phone System editor. Navigate across to the Devices column and click manage. This will open the device page for that user. Simply enter the name of the device you want to associate with that user and click Add.
Please note that it can take up to an hour for the update to take effect on the phone. To accelerate the process we recommend waiting for at least 2 minutes, then removing and then re-inserting the network cable from that device. This will provision the phone and will link the user to that device
Remote user provisioning is only supported on Yealink T38G and T4x range devices.
How do I remove a user from a device?
To remove a user from a device simply navigate to the user in question, click manage in the Devices column and you will be shown a list of devices for that user. Identify the device you want to remove the user from and click Delete. The change will take approximately 2 minutes to take effect.
Can I link a user to more than one device?
Yes, you can link a user to several devices, which is ideal for users that operate from several locations. You can link them to a device in each location.
Please note that whilst a user can be associated with multiple devices, a device can only be associated with one user - in order to ensure calls are routed to the correct user.
How do I delete a device?
To remove a device that you no longer wish to include in the system, click the Devices tab of the Phone System Editor and locate the device you wish to delete. Click the Delete button to delete the device.
Please note that you will be unable to delete a device that is currently linked to a user. You must first remove that device from the user (via the Manage Device link on the User record) and then delete the device.
Can I use this feature and hotdesking at the same time?
You can use this feature together with hotdesking in your offices, but you need to distinguish between the devices that you want to use for hotdesking and those that you want to associate to a known user.
We would recommend that users that have a dedicated desk within an office, you link that user to the device on that desk.
For users who don’t have a dedicated desk and use hotdesking, we suggest you use the hotdesking feature.
Please login to rate this article


